
December 8, 2019
Naturally, after my last post featuring skincare products and me admitting I’m not a fashion blogger, I’m doing it again. Except this time, it’s a DIY. I ain’t no DIY blogger either guys, but SO many people have already asked me oodles of questions about how this big ol’ charcuterie table got pulled off, […]
DIY Charcuterie Table


Naturally, after my last post featuring skincare products and me admitting I’m not a fashion blogger, I’m doing it again. Except this time, it’s a DIY. I ain’t no DIY blogger either guys, but SO many people have already asked me oodles of questions about how this big ol’ charcuterie table got pulled off, so I figured I’d share how I planned and executed it!

So, backstory – this was all for my good friend Janine, to celebrate her second baby coming soon! She asked for a laid back evening, sans kids, with a charcuterie board to snack on. I immediately knew what I was going to do since I had previously thrown a bachelorette party where I did something similar, but with FOUR 6′ Costco tables instead of the two I used for this party. Yeah, it was intense. And no, I’m a doofus and don’t have any pictures to show for it. Dumb.
I’ll give a quick rundown of all the goods that were used, then go through my process of getting it set up for ya! (For reference, this was a party for 12 ladies who all came with their appetites!)
What I Used
- Two 6′ Folding Tables
- Two White Tablecloths (120″x60″)
- Twelve Dark Green Linen Napkins
- Twelve Unfinished Mini Wooden Cutting Boards
- Twelve Weck 1/5 Liter Jelly Jars
- Twelve Wine Glasses
- Cutting Board Oil
- Mini Flatware
- 10′ Wood Plank (I couldn’t find the exact one on their website, but the dimensions of this one was 10’x1’x2″)
- Greenery from Trader Joe’s (spruce garlands and eucalyptus)
- Small Serving Bowls
- Wooden Cheese Knives
Food
- Variety of Cheeses (all were from Trader Joe’s and Costco – variety pack of brie and other hard cheese were from Costco, and many of the softer and specialty cheeses were from Trader Joe’s)
- Variety of Crackers from Trader Joe’s and Costco (don’t forget to grab a box of gluten free crackers!)
- Charcuterie Meat Sampler from Costco (one of these fed all of us!)
- Smoked Salmon
- Dark Grapes
- Berries
- Pears
- Apples
- Pomegranates
- Cucumber
- Rainbow Carrots
- Nut Mixes
- Marinated Olives (again, Trader Joe’s. To save time I’ll just put when something isn’t from there from here on out 😂)
- Hummus
- Kite Hill Chive Cream Cheese (from Whole Foods for our dairy-free friends)
- Herb Infused Olive Oil
- French Rolls Baked with Herb Butter
- Cornichons (teensy pickles)
- Herbed Feta, Olive, and Tomato Mix
- Rosemary

The Board
For both parties I’ve thrown that have had these huge charcuterie boards, everyone is always so amazed and confused about how I got such a long cheese board. And it’s not a fancy answer… Home Depot. They have so many different sizes that can work for any size table, so even if you’re creating one on your regular dining table, you can grab a plank for under $20. This 10′ board was only $16!
After using my orbital sander and sanding like a madwoman, I wiped it clean and applied the cutting board oil. There’s also a butcher block conditioner that I was told could be used, and it creates a bit more of a barrier from any liquid, so that’s a great option too.
We also wanted the board to be raised a bit so we could add greenery underneath, so we stuck a few random 2×4 blocks under for a little lift.

Place Settings & Favors
Instead of regular plates, I opted for individual mini cutting boards for each guest. I applied the same oil to them as I did to the large board to make them food-safe. In addition to those, I put together small jars of herb infused olive oil for each person to take home.
On top of the cutting boards, there was a french roll that was covered with herb butter (please go find this at your local Trader Joe’s, it’s by all the dairy. So, so good on everything), baked, and with a sprig of rosemary placed on top.
Oh, and don’t forget the wine glass.

Assembly
Honestly, I didn’t go into it with much of a game plan. I’m sure there are different techniques and proper ways to display different food types, but I ain’t that fancy. Really my only goal was to distribute things so that everyone was within arms reach of a little of everything. So, here’s the rundown of how we assembled everything:
- We started by putting out the serving bowls that held the hummus, pickles, feta mixtures, olives. Basically anything that could potentially seep into or spill off of the board. Zigzag ’em down the length of the board.
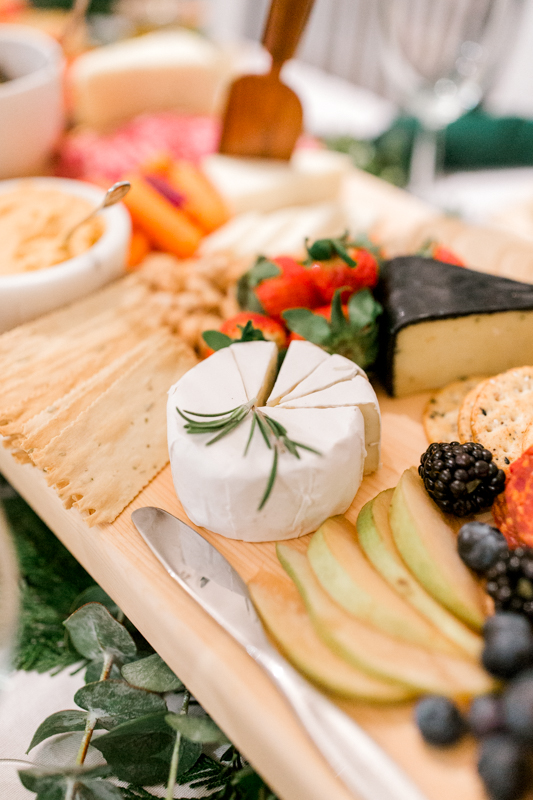
- Cheese was next, and for most of them we pre-cut a few slices which made for a little nicer presentation. One key thing we tried to keep in mind was to cut up popular cheeses and put them at different spots throughout the table. Cheddars and brie are great ones to have multiple little stations for, in case there are a few people like me who aren’t quite as adventurous with their cheeses.
- After that, we fanned out all the crackers we could muster. Aesthetically speaking, getting a variety of shapes, colors, and types of crackers is great. Mini toasts, breadsticks, those beloved fig ones from Trader Joe’s – all good options that add a little visual interest.
- Then we went with fruits and veggies since they can take up a good amount of space. We tried to stick with darker colored fruits, so we left out the typical citrus and opted for some pomegranates for purely aesthetic reasons.
- We had been working for a while at this point, and I totally spaced on one of the most important parts of a charcuterie board: the meat. Such a newb. Since meat is so easily manipulated, I think it’s nice to wait until toward the end of setup to stick them in there. Fanning, rolling, contorting them into tiny roses, you can do whatever you want.
- I’d call the last step “fillers”. Nuts, dried fruits, and sprigs of rosemary were our last items to display. Just fill in any random gaps with these, so convenient.

And there ya have it! The whole assembly took three of us about two hours total, but again that’s for a 10′ table, so it was a lot of food.
Sadly I didn’t take any photos of the woman-of-the-hour or any other guests, I was too absorbed in conversation and gorging myself apparently. But here are a few other shots of the setup!


Hi Casey!
Did you have a lot of leftovers? I’m wondering how much I should budget for! I am doing a 5’ board for ten ladies!
Any tips on how to best make it look fuller?
Thanks,
Marissa
Hey Marissa! Yes there was plenty of leftovers – but the ladies who stayed behind to help clean up took everything home 🙂 To make it look fuller, I’d wait to sit out the crackers until close to the end so you can fan them out a bit to fill up whatever space you need. You can also add some small bowls with scoop-able items in it (olives, messy stuff) that would take up some more space too. Even adding some florals throughout the board would look pretty!